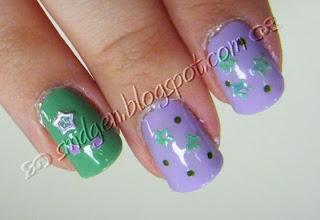
So pretty and funky and cool! How did I do it? With the help of some goodies from Viva la Nails!!
I heard about a sample package you can get if you blog, so I ordered one! It's coming from overseas (I'm in the USA), so it took a while to get here, but it was worth the wait! So much stuff and everything looked awesome. Here's the haul...
Such a great variety! Something for everyone really. I like it all. I will say, I got a lot of yellow, but that's ok, it's a pretty good color to work with as far as accenting goes. Gold and silver go with everything, lol.
I immediately picked out the star shaped dazzlings. For this mani I started with 3 coats of OPI Rumple's Wiggin on all but the ring fingers. On the ring fingers I used 3 coats of Avon Jade. I used the Hollow Stars in Mauve on the ring fingers putting one outline and 2 centers on each ring finger. I put a random number of Punched Stars in Azure on the remaining fingers. Then I figured it needed some extra bling to make it nice and fancy so I threw on some of the Glitter in Green.
OMG! It's righty! Haha. I don't often show my right hand... usually because it looks ugly... but this time it came out cute!
Right hand closer
Left hand closer
I think these nail art items were super easy to work with. The dazzlings are thicker, so I put on a good thick coat of regular clear and then 2 coats of Seche Vite on top. I did still have some corners that were pointy, but I kept the mani on for 4 days and nothing ripped off!
All the nail art items featured in this post can be purchased at Viva la Nails website for under £2!!!
[All nail polish in this post is my own and was purchased by me.]
[All Viva la Nails products were provided to me for review.]
September 4, 2010
Subscribe to:
Post Comments (Atom)


4 comments:
ooh, pretty design :) love the two colors!
Very pretty. Great haul :)
What a cute mani! Love it! ^^
@katrina - thanks! I wasn't sure about it at first, but I wound up loving it
@twister - thank you! :)
@jennifae - thanks, hehe
Post a Comment