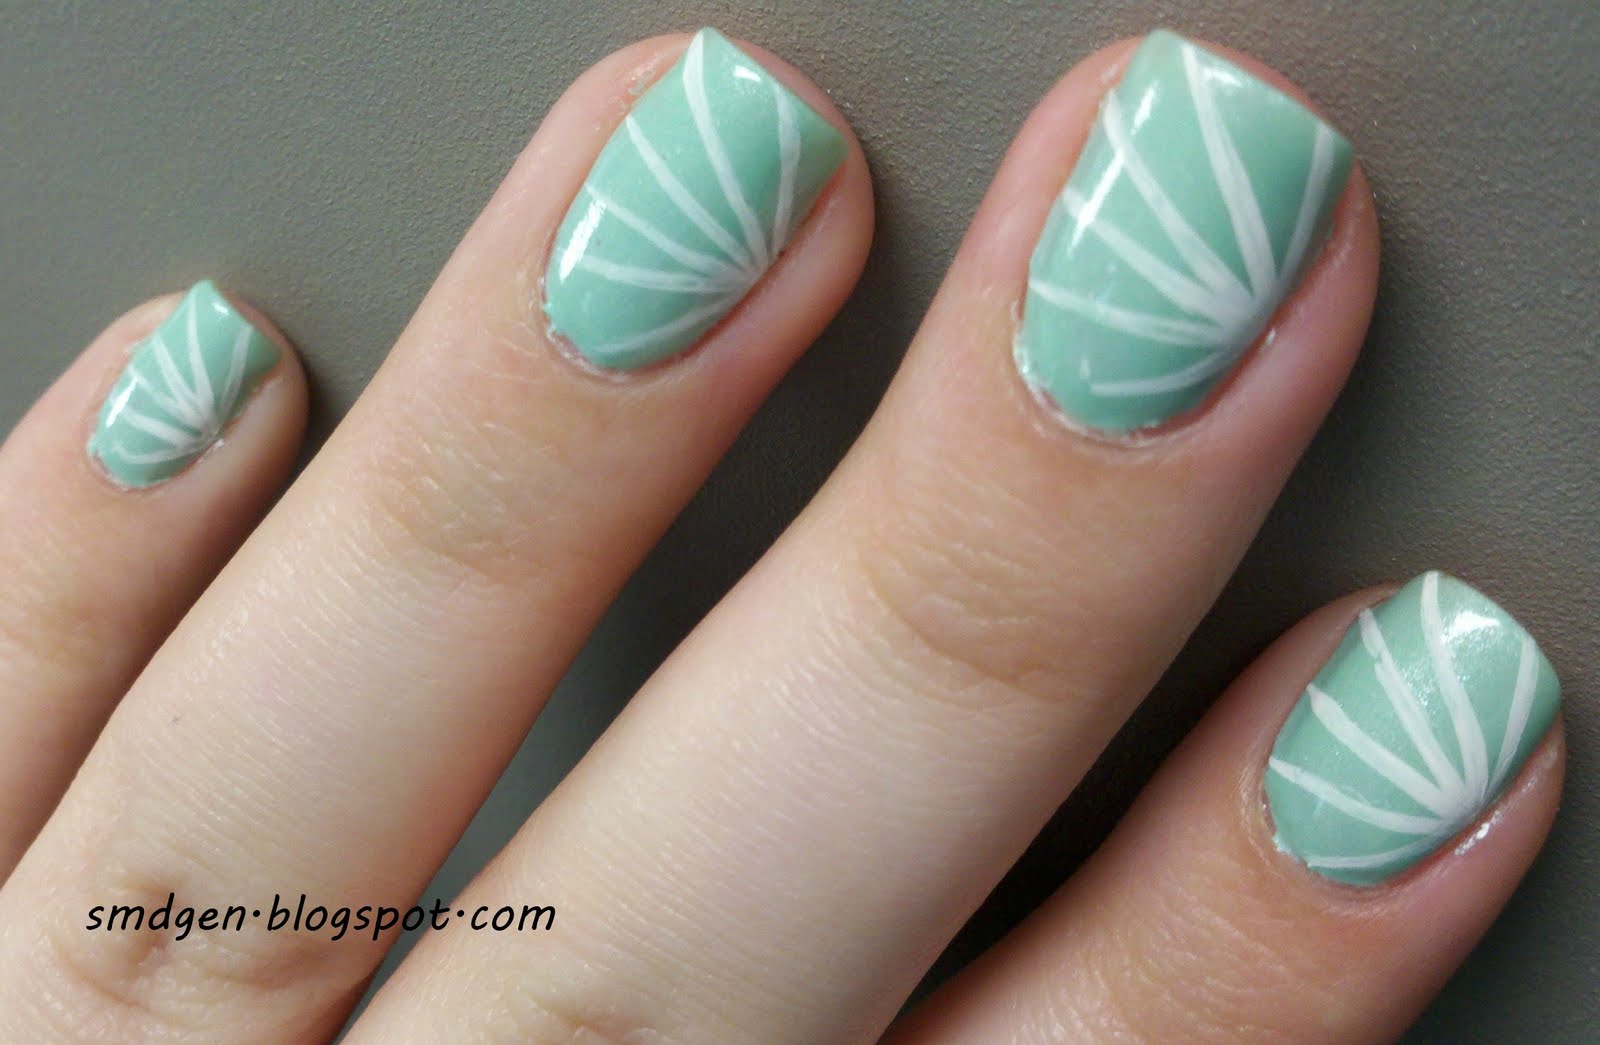
This one reminded me of the beach, not sure why. It's green and shimmery and it reminds me of the photos of the crystal clear water and the how the sand looks so warm and inviting. I could use some of that about now, lol.
This is 3 coats of Maybelline Gentile Blossom. I love this shade of minty green, it's so pretty. And then it has the added bonus of shimmer! It went on fairly well and had good coverage. I felt like it needed something, so I added stripes with Stripe Rite White.
I think it turned out cute! I like it. And to me, it looks nice and summery.
Showing posts with label green. Show all posts
July 27, 2011
March 23, 2011
St. Patty's Day
I didn't really get into St. Patty's Day this year. I didn't feel like going all out with nail art and drawing things. I figured a simple green mani would do. But then it was boring, so I added a glitter gradient, hehe. I like it!
This is 3 coats of Avon Jade with OPI Glow Up Already on the tips. The Avon went on ok, good coverage but it was a little streaky. I like the color because it's green, but it's on the blue side, which is my favorite. I love teal, so the bluer greens are more my speed. To do the glitter tips, I practically wiped it dry before putting it on so it would be more sparse.
It looks greener in this shot. I wound up really loving this mani. I like the glitter tips, it gives it a little pizazz without being obnoxious, lol. And it's really easy to do, so that helps, lol. Plus I always think glitter helps with wear. So this mani lasted a good long time.
Just for fun, haha. I had this duck on my desk, so I picked him up for a pic. Isn't he cute? Hehehe. Happy St. Patty's Day!!
This is 3 coats of Avon Jade with OPI Glow Up Already on the tips. The Avon went on ok, good coverage but it was a little streaky. I like the color because it's green, but it's on the blue side, which is my favorite. I love teal, so the bluer greens are more my speed. To do the glitter tips, I practically wiped it dry before putting it on so it would be more sparse.
It looks greener in this shot. I wound up really loving this mani. I like the glitter tips, it gives it a little pizazz without being obnoxious, lol. And it's really easy to do, so that helps, lol. Plus I always think glitter helps with wear. So this mani lasted a good long time.
Just for fun, haha. I had this duck on my desk, so I picked him up for a pic. Isn't he cute? Hehehe. Happy St. Patty's Day!!
November 11, 2010
Models Own Jade Stone
There is just something about Models Own polish. For the most part, they are so easy to apply, have great opacity... I just love them. So I had to pick up a few more when they had the 50% off sale! C'mon, that's a crazy deal! For some reason, I got a bunch of pastel colors, haha. But this one was the one I was really looking forward to.
This is 2 coats of Models Own Jade Stone. It's so creamy and delicious! This applied like a dream. Not too thick or too thin, great coverage. I like these brushes, they are easy to handle and control. Another thing I love about Models Own is the wear. I had no trouble with chipping on this.
This is full sun. Looks very minty in this pic. It is minty green in some light, more blue... and in other light it's more yellow and like a true green. I like that aspect too. Makes it more interesting.
Indoors, a little less minty in this shot. I still kind of want to eat it tho, haha. Love this color and application. Everything about it is just bliss, hehe.
This is 2 coats of Models Own Jade Stone. It's so creamy and delicious! This applied like a dream. Not too thick or too thin, great coverage. I like these brushes, they are easy to handle and control. Another thing I love about Models Own is the wear. I had no trouble with chipping on this.
This is full sun. Looks very minty in this pic. It is minty green in some light, more blue... and in other light it's more yellow and like a true green. I like that aspect too. Makes it more interesting.
Indoors, a little less minty in this shot. I still kind of want to eat it tho, haha. Love this color and application. Everything about it is just bliss, hehe.
October 18, 2010
China Glaze Awakening
I have to say, I'm extremely pleased with the China Glaze Awakening set. I love the colors and the glitter! I like that it's not the classic orange creme. It's fun and exciting and eye-catching for sure!
First up is Mummy May I. This looks like a really dark purple, but maybe it's black. It's loaded with magenta-purple square glitter! This is 3 coats of pure heaven. So much better than my previous Wet 'n Wild purchase that wants to be a dupe. I LOVE this color. And it would work all year round.
Next is Zombie Zest. This is also 3 coats, and you can see I still have VNL. It's a really cool yellowish green color with gold-yellow fine glitter. It reminds me of snot or something, haha. It kinda grosses me out. To me, this is Halloween only.
Last up is Ick-A-Bod-Y. This is really cool looking. 3 coats. It's appears to be a dark greenish base with orange chunky glitter. I really love this. I was actually unsure about this color before trying it, but it looks really good on! It reminds me of the fall and leaves changing color and harvest, which is my fave! This was a surprising like for me, I didn't think I would enjoy this one. But it's really bumpy without top coat, haha.
Overall, application was easy. With glitter, it's sometimes hard to get it on evenly and looking well distributed. This wasn't as hard as I've dealt with in the past, but it wasn't perfect either. Zombie Zest had fine glitter and the other two are chunky and lumpy. You'd definitely need a top coat. And if you don't like VNL, you'll need a base with Zombie Zest.
Don't forget to check out my giveaway where you have a chance to win these beauties!! (Don't worry, I bought 2 of these, so the ones in the giveaway are still unused!)
First up is Mummy May I. This looks like a really dark purple, but maybe it's black. It's loaded with magenta-purple square glitter! This is 3 coats of pure heaven. So much better than my previous Wet 'n Wild purchase that wants to be a dupe. I LOVE this color. And it would work all year round.
Next is Zombie Zest. This is also 3 coats, and you can see I still have VNL. It's a really cool yellowish green color with gold-yellow fine glitter. It reminds me of snot or something, haha. It kinda grosses me out. To me, this is Halloween only.
Last up is Ick-A-Bod-Y. This is really cool looking. 3 coats. It's appears to be a dark greenish base with orange chunky glitter. I really love this. I was actually unsure about this color before trying it, but it looks really good on! It reminds me of the fall and leaves changing color and harvest, which is my fave! This was a surprising like for me, I didn't think I would enjoy this one. But it's really bumpy without top coat, haha.
Overall, application was easy. With glitter, it's sometimes hard to get it on evenly and looking well distributed. This wasn't as hard as I've dealt with in the past, but it wasn't perfect either. Zombie Zest had fine glitter and the other two are chunky and lumpy. You'd definitely need a top coat. And if you don't like VNL, you'll need a base with Zombie Zest.
Don't forget to check out my giveaway where you have a chance to win these beauties!! (Don't worry, I bought 2 of these, so the ones in the giveaway are still unused!)
October 12, 2010
Frankie!
I found this on the internet... here. I couldn't help myself, they are just so cute! They're really easy too. Check the link for the tutorial on how to do these.
I used American Apparel Office for the base. Then used Sally Hansen White On and Black Out for accents. I think they turned out adorable! I got a million compliments too.
The other hand too! I like the middle finger on this hand because of the crooked mouth. Makes him look like he's up to no good.
As you can see, I should have waited a bit before putting on the top coat. I just didn't want to ruin them!
I used American Apparel Office for the base. Then used Sally Hansen White On and Black Out for accents. I think they turned out adorable! I got a million compliments too.
The other hand too! I like the middle finger on this hand because of the crooked mouth. Makes him look like he's up to no good.
As you can see, I should have waited a bit before putting on the top coat. I just didn't want to ruin them!
September 16, 2010
China Glaze Vintage Vixen
I took a look at the fall China Glaze Vintage Vixen collection at my local Sally's. I was tempted to buy them all, haha. I tried to pick up something that I don't have much of. I just so happened to pick Christmas colors, red and green, lol. Oh well. I actually picked these up a while ago, but they sat there for a bit. And then I used them and took photos and the photos sat for bit. Better late than never, right?
This is China Glaze Emerald Fitzgerald. 2 coats! Of course, Seche Vite on top. I loved this application because it had great coverage. The brushes from China Glaze are slim, but spread nicely on the nail. No cuticle drag or other issues to note.
I love this color! In these photos it's showing more teal. In some light it was teal, in other light it was emerald green. I have no idea why, but that really intrigued me. I love that it's shimmery and not a true frost. You can't really see the brush strokes, which is good for me since I suck at that, lol.
This is 2 coats Riveter Rouge with Seche. Again, application was good, no real issues. Good coverage and good opacity.
Since this was a deeper red with golden shimmer, I chose rhinestones to make the gold pop. Check that giant orange one! Love those over-sized rhinestones, lol. This polish didn't change color in different light like the green did, but it's still nice and shimmery and pretty.
I loved both these colors and would recommend them! And hey, if you're looking to do a christmas mani, this might be right up your alley in terms of shade, haha.
This is China Glaze Emerald Fitzgerald. 2 coats! Of course, Seche Vite on top. I loved this application because it had great coverage. The brushes from China Glaze are slim, but spread nicely on the nail. No cuticle drag or other issues to note.
I love this color! In these photos it's showing more teal. In some light it was teal, in other light it was emerald green. I have no idea why, but that really intrigued me. I love that it's shimmery and not a true frost. You can't really see the brush strokes, which is good for me since I suck at that, lol.
This is 2 coats Riveter Rouge with Seche. Again, application was good, no real issues. Good coverage and good opacity.
Since this was a deeper red with golden shimmer, I chose rhinestones to make the gold pop. Check that giant orange one! Love those over-sized rhinestones, lol. This polish didn't change color in different light like the green did, but it's still nice and shimmery and pretty.
I loved both these colors and would recommend them! And hey, if you're looking to do a christmas mani, this might be right up your alley in terms of shade, haha.
Tags:
China Glaze,
green,
red,
shimmer
September 4, 2010
Viva la Nails Review
So pretty and funky and cool! How did I do it? With the help of some goodies from Viva la Nails!!
I heard about a sample package you can get if you blog, so I ordered one! It's coming from overseas (I'm in the USA), so it took a while to get here, but it was worth the wait! So much stuff and everything looked awesome. Here's the haul...
Such a great variety! Something for everyone really. I like it all. I will say, I got a lot of yellow, but that's ok, it's a pretty good color to work with as far as accenting goes. Gold and silver go with everything, lol.
I immediately picked out the star shaped dazzlings. For this mani I started with 3 coats of OPI Rumple's Wiggin on all but the ring fingers. On the ring fingers I used 3 coats of Avon Jade. I used the Hollow Stars in Mauve on the ring fingers putting one outline and 2 centers on each ring finger. I put a random number of Punched Stars in Azure on the remaining fingers. Then I figured it needed some extra bling to make it nice and fancy so I threw on some of the Glitter in Green.
OMG! It's righty! Haha. I don't often show my right hand... usually because it looks ugly... but this time it came out cute!
Right hand closer
Left hand closer
I think these nail art items were super easy to work with. The dazzlings are thicker, so I put on a good thick coat of regular clear and then 2 coats of Seche Vite on top. I did still have some corners that were pointy, but I kept the mani on for 4 days and nothing ripped off!
All the nail art items featured in this post can be purchased at Viva la Nails website for under £2!!!
[All nail polish in this post is my own and was purchased by me.]
[All Viva la Nails products were provided to me for review.]
I heard about a sample package you can get if you blog, so I ordered one! It's coming from overseas (I'm in the USA), so it took a while to get here, but it was worth the wait! So much stuff and everything looked awesome. Here's the haul...
Such a great variety! Something for everyone really. I like it all. I will say, I got a lot of yellow, but that's ok, it's a pretty good color to work with as far as accenting goes. Gold and silver go with everything, lol.
I immediately picked out the star shaped dazzlings. For this mani I started with 3 coats of OPI Rumple's Wiggin on all but the ring fingers. On the ring fingers I used 3 coats of Avon Jade. I used the Hollow Stars in Mauve on the ring fingers putting one outline and 2 centers on each ring finger. I put a random number of Punched Stars in Azure on the remaining fingers. Then I figured it needed some extra bling to make it nice and fancy so I threw on some of the Glitter in Green.
OMG! It's righty! Haha. I don't often show my right hand... usually because it looks ugly... but this time it came out cute!
Right hand closer
Left hand closer
I think these nail art items were super easy to work with. The dazzlings are thicker, so I put on a good thick coat of regular clear and then 2 coats of Seche Vite on top. I did still have some corners that were pointy, but I kept the mani on for 4 days and nothing ripped off!
All the nail art items featured in this post can be purchased at Viva la Nails website for under £2!!!
[All nail polish in this post is my own and was purchased by me.]
[All Viva la Nails products were provided to me for review.]
August 18, 2010
American Apparel: Office
I have to say, I really like the American Apparel polishes. This is only the second one I've tried, but I love them both! This is such a pretty shade of green. Kinda dusty mint. This is 3 coats of American Apparel Office. Application was standard, not too bad, but not amazing. I didn't have any cuticle drag issues. I did NOT take this photo on day one. I forget how long I'd worn this mani before I took the photo, but it was at least a couple days into it. So wear was really good. I used Milani Fresh Teal to stamp the crown on. I topped it all with 2 coats Seche Vite. I'm not sure where I thought I was going with the stamping, but I know I was originally going to add some gold. But then I stopped because I liked the tonal look of this. I think it came out cute.
June 14, 2010
Orly: Green Apple
I love this color. This is 3 coats of Orly Green Apple with 2 coats Seche Vite. This is a bright yellowish green, but definitely more green. Very springy. Application was fairly good, but it was a tad streaky. I have some tip wear after wearing it all day at work, but it's not horrible. I attempted to stamp some white flowers, but they came out like crap, so I took it off. I like it plain, it's vivid. Got a few compliments on it too, which is always nice.
May 10, 2010
Broadway Nails Review
I was at the drugstore looking at polish and normally go right past the fake nails. However, these caught my eye! At first, I was just going to take a pic and try to re-create it myself, but I figured, what the heck, I'll buy them. They looked super cute.
These are Broadway Nails Fashion Diva Nail Kit in Harajuku Style. They are a mismatch plaid in pink, orange and green neon! How cool! These are the "short" length which turns out is just about the same length as my own nails. They have the little tabs for application. I didn't use the glue that came with them, but it does come with a pink tinted glue. I have to say, I love the look and I easily found nails that fit, which is the most important part. I left them on for 5 days. None of them were falling off, but the edges had started to come loose by the end. Not sure if this is due to improper initial application, or if the nails were starting to go. I haven't put on fake nails in years, and I've never done so on a consistent basis, so it's possible this was a user error. They did show tip wear by the end, but none of them had chipped horribly and you couldn't tell unless you had my nail up to your eyes anyway. I got them off by just soaking cotton in Acetone and placing it on the nail. After a few minutes, the fake nail puffed up and slid right off. (This is my normal process for taking off nail polish except I usually just use remover and not straight Acetone). Overall, I was very pleased with these nails and would definitely get them again. They come in various designs and lengths. This would be a great alternative for a quick mani for a special occasion.
[These nails were purchased with my own money for my own personal use.]
These are Broadway Nails Fashion Diva Nail Kit in Harajuku Style. They are a mismatch plaid in pink, orange and green neon! How cool! These are the "short" length which turns out is just about the same length as my own nails. They have the little tabs for application. I didn't use the glue that came with them, but it does come with a pink tinted glue. I have to say, I love the look and I easily found nails that fit, which is the most important part. I left them on for 5 days. None of them were falling off, but the edges had started to come loose by the end. Not sure if this is due to improper initial application, or if the nails were starting to go. I haven't put on fake nails in years, and I've never done so on a consistent basis, so it's possible this was a user error. They did show tip wear by the end, but none of them had chipped horribly and you couldn't tell unless you had my nail up to your eyes anyway. I got them off by just soaking cotton in Acetone and placing it on the nail. After a few minutes, the fake nail puffed up and slid right off. (This is my normal process for taking off nail polish except I usually just use remover and not straight Acetone). Overall, I was very pleased with these nails and would definitely get them again. They come in various designs and lengths. This would be a great alternative for a quick mani for a special occasion.
[These nails were purchased with my own money for my own personal use.]
March 17, 2010
Happy St. Patrick's Day!
Happy St. Patrick's Day!! I am not really celebrating much this year as I'm leaving in the morning on vacation. Just a few drinks, I'll be fine, right? I'll find out in the morning, haha.
I read a few reviews of the little Essence polishes they brought to the US via Ulta. None were good concerning quality. I didn't have my hopes set high. And I wasn't impressed either. I used Essence Check me Out as a base. This is 3 coats and some glops to fill in bald spots, lol. I still had VNL so I used China Glaze Watermelon Rind to add a french tip. Then to make it more festive, I added a 4 leaf clover on the ring finger with OPI Jade is the New Black. Topped it all off with 2 coats of TC.
I will say, on a side note, I actually used Poshe for this mani. I've read that a lot of people like it and some say it's just as good if not better than Seche Vite (my HG). I'll be honest, I never tried Poshe before this mani. However, I did this mani on Sunday. By Monday, I had small chips in the corners of two nails which I was able to fill in with some extra Watermelon Rind without drawing too much attention to it. I added a third coat of Poshe on after the touch-up. By Tuesday night I had to fix two fairly large chips on two nails and a couple more small chips. Touched up and added a forth coat of Poshe. I thankfully made it through work today without chipping, just slight tip-wear. However, at some point since I got home a few hours ago, I've chipped off a large chunk of the left thumb. I can usually make a mani last a week with Seche, so I have to say I'm extremely disappointed. And I am blaming Poshe although I've never used the Essence polish either. I suppose it's possible that the Essence just didn't want to stay on. I won't complete banish the Poshe just yet, but I'm putting Seche on my vacay mani so I don't have to worry!
I read a few reviews of the little Essence polishes they brought to the US via Ulta. None were good concerning quality. I didn't have my hopes set high. And I wasn't impressed either. I used Essence Check me Out as a base. This is 3 coats and some glops to fill in bald spots, lol. I still had VNL so I used China Glaze Watermelon Rind to add a french tip. Then to make it more festive, I added a 4 leaf clover on the ring finger with OPI Jade is the New Black. Topped it all off with 2 coats of TC.
I will say, on a side note, I actually used Poshe for this mani. I've read that a lot of people like it and some say it's just as good if not better than Seche Vite (my HG). I'll be honest, I never tried Poshe before this mani. However, I did this mani on Sunday. By Monday, I had small chips in the corners of two nails which I was able to fill in with some extra Watermelon Rind without drawing too much attention to it. I added a third coat of Poshe on after the touch-up. By Tuesday night I had to fix two fairly large chips on two nails and a couple more small chips. Touched up and added a forth coat of Poshe. I thankfully made it through work today without chipping, just slight tip-wear. However, at some point since I got home a few hours ago, I've chipped off a large chunk of the left thumb. I can usually make a mani last a week with Seche, so I have to say I'm extremely disappointed. And I am blaming Poshe although I've never used the Essence polish either. I suppose it's possible that the Essence just didn't want to stay on. I won't complete banish the Poshe just yet, but I'm putting Seche on my vacay mani so I don't have to worry!
Tags:
China Glaze,
essence,
green,
OPI
Subscribe to:
Posts (Atom)